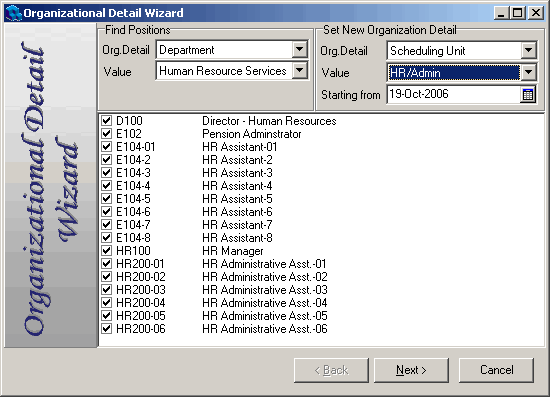
To use the Wizard to attach positions to Org Details
- Click the Wizard button on the Positions window toolbar.
The Organizational Detail Wizard opens. - Select an Org Detail from the Org Details list box under the Find Positions heading at the left side of the Wizard.
You can choose to select an Org Detail that will list every position in your organization, or you can narrow it down to show only the positions in a department. - Select an Org Detail.
Depending on what Org Detail you have selected, for example Organization, there could only be one available value. Other Org Details, for example, at the department level, will give you several choices. - Select your scheduling Org Level from the Org Level list box under the Set New Organization Level and Detail heading at the right side of the Wizard.
- Select a scheduling unit from the Org Detail list box at the right side of the dialog.

- Clear any positions that you don't want associated to the selected Org Detail.
For example, if you had all of your cooks in one scheduling unit, you would clear all non-cook positions. - Click Next.
A report showing the Org Detail changes appears. - Click Next.
- After reading the warning dialog that appears, click Yes to continue.
The Org Detail will now be associated to all positions you selected. For example, if you created an Org. Level called "Schedule Unit" and an Org Detail (org level) called "Cardiac," all of the positions you attached the Org Detail to will be grouped together in the Cardiac scheduling unit. You can now create a schedule just for the unit and all of the employees who occupy the associated positions. - Click Next.
A report opens, showing the positions that have been attached to the Org Detail. - Click Next.
- Click Yes on the warning dialog that appears.
- Repeat the steps to attach additional positions to Org Details. If you create an Org Detail but don't associate it with any positions, it will not be available for selection when you go to set up scheduling units on the Self Scheduling Setup window.
Note! Access rights to the Wizard are set at the Security Profile level. For more information on configuring security access to the Wizard, see Assigning Access Rights to User Interface Controls.
